Category: Blog

Annabelle Arborescens Smooth Hydrangea Variety

Hydrangea

Annabelle Smooth Hydrangea

The best known Smooth Hydrangea arborescens variety is Annabelle.

Until quite recently it was the only variety of Hydrangea arborescens that was recognized by the general public and readily available in garden centers.

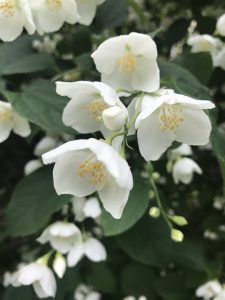
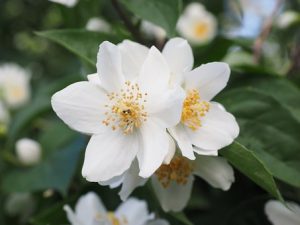
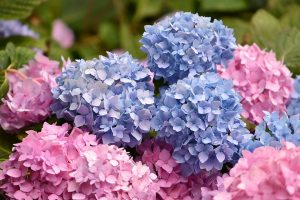
Annabelle Smooth Hydrangea features stunning white flowers that frequently feature heads that are greater than 10 inches in diameter. Annabelle, unlike the better known pink and blue hydrangeas (macrophyllas), blooms each year, even following intensely cold winters or severe pruning. The white, big “drumstick” blooms appear without fail in profusion. Some individuals plant ‘Annabelle’ in the form of a hedge given that it can be severely cut back during the winter to give it a tidy appearance.

‘Annabelle’ provides a spectacular display in colder areas along with warm regions. We have seen reports that it is even hardy in Zones 3 and 2 in the United States (rate officially to Zone 3). There are kinds of Hydrangea arborescens that are native to eastern regions of the United States. If the climate in your area is too harsh for growing macrophyllas, then ‘Annabelle’ is a great alternative to consider.

Care Of The Annabelle Hydrangea

Like most of the other hydrangeas, the Annabelle prefers morning sun and dappled shade all day or afternoon shade, especially in the south. Annabelle does very well in all day sun in northern parts of the U.S. According to some books it does better in heavy shady compared to other hydrangeas, but we haven’t found this to be true. The more morning sun that it gets the better that it blooms for us. Arborescens thrive both in the deep south and cold northern climates (Zones 8-3).

How To Support The Droopy, Heavy Bloom Heads Of The Annabelle

Hydrangea - heavy flower heads

Everybody who grows this gorgeous hydrangea knows that this is a really important challenge. Annabelle’s blooms are so big that they have a tendency to bend all the way to the ground following a rain. It can become such a severe problem that the entire shrub gets flattened. The following are a few tips that you can use with all big blooming arborescens in order to reduce the problem or eliminate it completely.

1. Plant your Annabelles close to a decorative fence. It is one of the best ideas that we have come across for taking the Hydrangea arborescens heavy blooms.

2. Plant three Annabelle shrubs together at least. As the Annabelle matures they grow together and somewhat support each other. Plant them approximately three or four feet apart.

3. Only sparingly prune your plants. If your hydrangeas have a tendency to flatten during the rain, it might help with pruning Annabelle to around 18″ to 24″ tall instead of cutting them to the ground each year. That will enable the stems to thicken a bit every year, which becomes stouter and allow the blooms and other branches to support them better. Also, the heads become more plentiful but a bit smaller (not too small so that you are disappointed). These sightly small heads are not as likely to droop. In more northern areas, you might not be able to use this particular tip. Annabelle stems might not survive the winter, and therefore, they will be new each year from the ground.

4. Place a short wire fence around every plant. If you surround young Annabelle plants with wire fences before they put new branches out in the spring, then it will keep the blooms off of the ground. Quite often garden centers sell green wire short (18″) fencing to line flower beds. Cut them into lengths that encircle the base of your Annabelle plant (similar to a short tomato cage). Once the Anabelle leafs out, it completely hides the wire.

Pruning Annabelle Hydrangea

Every year the Annabelle Hydrangea grows its blooms on new wood. The shrubs are vigorous bloomers and are able to handle aggressive pruning. As stated above, however, just prune to 18″ to 24″ if you want your plants to have stronger limbs. However, you can prune all the way back to the ground every year and those incredible plant will bounce back no problem with beautiful flowers. The only time that you shouldn’t spring during the spring, since this when the shrubs are preparing to do their blooming.

Spacing Of The Annabelle Hydrangea

If you are planning to plant a hedge or would like the shrubs to connect and also help to support one another, then plant them 3 or 4 feet apart. Or plant, shrubs 5 to 6 feet apart.

Planting Bulbs For Spring Flowers

flowers from bulbs

If you love the blooming of hyacinths, tulips, and daffodils in the spring, you should remember that you have to plant these bulbs in the fall. Check out the handy chart of bulbs planted in the fall in your zone and order yours in advance or mark your calendar to ensure that you never forget.

Planting Bulbs for Spring Flowers

Bulbs that flower in spring are planted in the fall to give them enough time for their roots to grow during winter and come up in early spring. So, if you consider autumn to be the time to cease all gardening activities, think again. Fall is time to plant your bulbs. It is rather easy to stick bulbs in the ground but yet so magical too to see their lovely blooms emerging in either later winter or early spring.

You can order bulbs from a mail-order catalogue ahead of time to ensure that they arrive in time to be planted in the fall. Alternatively, you can make a note in your calendar to buy them in early fall. Planting time is typically late September to mid-October in northern climate to ensure that your bulbs grow before winter kicks in. (Tulips, however, are an exception since they can be planted late.) In southern climates, bulbs should be planted in mid-October through November; you may even plant them as late as December, but keep in mind that the longer you wait, the harder it will be for your bulbs to establish themselves.

flower bulbs

Ensure that you only buy bulbs from reputable garden centers or nurseries. Keep in mind that second-rate bulbs don’t sprout at all, produce second-rate flowers, and usually don’t return year after year. You should not forget to plant extra for cutting so that you can transfer some of the spring color indoors.

Bulbs to Plant in the Fall

Here are the most popular bulbs that bloom in the spring but are planted during fall:

– Daffodils are popular because they are deer- and vole-resistant.

– Tulips look great when planted ‘en masse’ and when planted with grape hyacinth and typically bloom after daffodils.

– Snowdrop (Galanthus) are early spring blooming little white bells.

– Crocus come in a wide variety of colors and are a spring-flowering favourite.

– Jonquils naturalize and have tiny blooms. They are some of the first ones to bloom and look great when planted together in a field or grove.

– Gladiolus have tall lovely spikes and depending on the variety, they usually bloom in late spring to mid-summer.

– Irises are easy to grow, reliable, hardy, make lovely cut flowers and attract hummingbirds and butterflies.

– Hyacinth (grape hyacinth included) are small blue clusters of small bell-shaped blooms that are great for naturalizing.

When Should You Plant Bulbs?

Fall bulbs should be planted once the heat of summer passes, but prior to the ground freezing. Consult the Frost Dates Calculator to find out when your area will experience the first fall frost. In the lower South, a hard freeze is not common, so you can plant in early November.

Ideally, bulbs should be planted soon after purchase

– If you are unable to plant your bulbs immediately, store them in a dry area at about 60°F to 65°F since temperatures higher than 70°F can damage the flower buds.

– In the South where it is warmer, note that you have to treat some bulbs as annuals rather than perennials; they will bloom once and they will be done. For instance, you will need to plant your tulip bulbs again every year. However, they are a lovely sight and definitely worth the effort. Bulbs planted in fall, such as daffodils act as perennials and will come up every year.

– You may have to pre-cool some bulbs if you live in warm climates. The vast majority of bulbs that flower during spring require a cold period of anywhere from 12 to 16 weeks in ventilated packages in the bottom of your refrigerator at 40°F to 50°F before you plant them. Check with the supplier to find out whether the bulbs you buy have been pre-cooled or whether they require a cold treatment.

How Should You Plant Bulbs?

– Find a site with properly drained soil and lots of sun. Work several inches of compost into the soil before you plant.

– Bulbs look great when planted near the mailbox, in a grove, as colourful borders, or as swaths of colors in garden beds.

– Bulbs should be planted ideally at a depth of 3 times the bulb’s width.

– Water your bulbs well after you plant them and use mulch to hold in moisture and keep the weeds down.

– Plant bulbs generously should some fail to sprout. You should also plant them in random order and spacing to create a more natural appearance. If you love blanketed landscapes of tulips or groves of daffodils, be ready to purchase and plant many bulbs.

– Do you have squirrels or voles in your area? If so, you should consider planting bulbs in a “cage” fashioned with chicken wire. You should also check out the tips for preventing squirrel and vole damage. Alternatively, plant some rodent proof bulbs.

Interested in a multitude of blossoms? Check our post on The Mock Orange

All About Growing and Caring for the Mock Orange

For the most part, the mock orange ( Philadelphus coronarius) is deciduous with many stems and a spread that is as wide as it is high. Scientifically, it is classified as a shrub, but many people who have a mock orange in their yard will insist that it is a tree.

Mock orange shrubs are rich with aromatic flowers and sweet nectar that attracts butterflies.

The “mock” in the title means that this is not actually an orange tree. However it does bear a strikingly similar aroma of citrus zest. When many plants are referred to as “mock” or “false”, this usually means that this plant has similarities to another. Like the false cypress for example.

false cypress branch

Common Name –– Mock Orange Tree, Mock Orange Shrub, Mock Orange Bush
Plant Type –– Deciduous Shrub
Mature Size –– from 6 – 12-ft. high and 6 – 12-ft. wide
Sun Exposure –– Full sun / partial shade
Soil Type –– Well-drained soil
Flower Color –– White
Soil pH –– 6 to 8
Hardiness Zones –– 4 through 8
Bloom Time –– Spring
Native Areas –– Southeast Europe and Italy

How to Grow Mock Orange Shrubs

Mock orange plants put on a magnificent display during the spring, but then pretty much do nothing else for the rest of the year. They are simply not attractive enough to be considered specimen plants. Massed along the hedges they can create an effective privacy barrier and in the spring the cut flowers are terrific aromatics and gifts.

The fragrance is one of the major selling points for the mock orange, but not all cultivars are as fragrant as the rest. If you will be buying a mock orange for its fragrance, the best place to begin is in the nursery where all fragrances can be examined one by one. You can also take time to read the descriptions but sampling the smells is the only way to know for sure.

Remember that these flowers are more fragrant in the evenings than the mornings.

Light

These plants need full exposure to light or at least partial exposure for best results. Those plants placed in the sunlight will produce the most blossoms.

Soil

The mock orange plant thrives best in moist soil with excellent drainage. When planting your mock orange, dig dep and prepare to spread it roots outward.

Water

The mock orange is relatively drought tolerant but your will still want to avoid letting the soil dry out all the way. The root system of these plants is especially tough so some older plants can survive on less water.

Temperature and Humidity

The mock orange is hardy in the winter and don’t require any winter protection even when temperatures drop below freezing. Then they will blossom in the spring.

Fertilizer

Use regular compost, manure or bark hummus when planting the mock orange and then add some more compost in the spring. You should stay away from high-nitrogen fertilizers as these will cause leaf growth issues and even prevent full blossoming capacity.

Varieties of Mock Orange Shrubs

There are over 60 different varieties of the mock orange.

Aurea flower

Aurea is a compact mock orange cultivar with golden leaves, it grows between 8 to 10 feet high.

aurea

Variegatus is even shorter and will only reach a height of 6ft. As its name suggests it has a lovely variegated foliage of greens and white.

mock orange flower

Minnesota Snowflake (P. coronarius) is another popular variety of the mock orange and known for an especially pleasant fragrance from its blossoms. Of course, this will vary between each individual cultivar. The plants bear pretty green leaves and white flowers in the spring. The Minnesota snowflake will grow as tall as 8-ft X 8-ft.

Pruning

Mock oranges bloom on last year’s growth so make sur you are pruning your shrubs immediately after the blooming season. Prune off the outer facing buds from stems that have just finished flowering and cut away any badly formed or positioned stems as well.

As the shrub grows the long whip-like stems can become a little unkempt. This is when you can begin applying the 1/3 rule just as you would when pruning a lilac tree. Each year when doing the pruning, you will prune the 1/3 of stems that are the olds. Prune these all the way down to the roots and in a few years your mock orange shrub will look brand new.

Even if your mock orange tree has become wildly overgrown, you shouldn’t worry because a healthy tree will respond well even to a lot of pruning in the spring. Begin just before the flowering season begins and prune all the branches that need trimming down to the ground level. You may not enjoy a splendid blossom array that year, but the plant’s energy will begin moving into new branches and the next year should be even better.

Planting, Growing And Caring For Hostas

hosta bouquet

If you have a shady garden, hostas are a hardy perennial that could be perfect for you.

They are easy to grow and reliable while being long-lived. Hostas are also great because they come in a range of sizes, textures, and colors.

hosta flower bloom

They will also work in any kind of garden.

Hostas are most well-known for their foliage, but the plants will also have lovely flowers in the summer months. The flowers come in lavender, pink and white. They are also a favourite with Hummingbirds.

One issue is that snails, slugs, rabbits, and deer also love these plants. You will have to keep this in mind if you often have deer wandering through your garden.

Planting

In the spring, you should buy your hostas as potted plants or dormant and bare-root divisions. When planting, you need to set the plants with their crown even with the soil. The growing tips should be visible at the surface of the soil.

If you have purchased potted plants, you will need to plant them at the same soil level as they had in the pot. The soil will then need to be gently dampened. Water the soil until it is moist.

Care

After planting or when you first see growth, you should apply a well-balanced fertilizer. Ideally, this should be a slow release fertilizer. The soil will also need to be kept moist, but do not overwater and allow the soil to become wet. To retain moisture, you should place mulch around the plant.

After the flowers have bloomed you should remove the flower stalks. This will encourage new growth. You also need to clean up around the plants and remove any brown leaves in the fall. This helps to control slugs and disease. Dividing and transplanting are best left to until the early spring when leaves start to come through.

Transplanting And Dividing

You do not have to divide the plants for their health. If the plant has less space, it will simply grow at a slower rate. However, if you want a neater appearance, you can divide your hostas.

You should leave this for the early spring. This will also be the best time to transplant the divided plants or move the plant to a new area. When dividing the plant, you should leave as much of the root attached as possible to each crown. The new plants will need to be planted at the same soil level as previously and watered until established.

Diseases And Pests

If you see any irregular holes on the edges of the leaves or an entire leave has been chewed off, nocturnal slugs are generally to blame. You will need to look for any slime trails leading to your plant. These trails may also be present on the other leaves of the plant.

Deer love hostas and you will need to discourage them from eating your plant.

deer in field of green

To do this, you should use fencing or a sprinkler. You can also get deer repellents from your local garden center if you do not want to use fences.

If there are clean-cut chew mars on the stems and leaves of your young plants, a rabbit could be to blame. To determine if they are the cause, you need to look for dropped leaves and rabbit droppings.

Additional Insights

Young leaves on your plant are edible. In Japan, the leaves are fried in tempura, but they can also be eaten raw. The flavor will be similar to asparagus or lettuce.

The Rules of Thumb for Ornamental Grasses

pink-muhly-ornamental-grass-blowing-in-wind

I get a lot of questions about ornamental grasses, but two come up more than any others. These are, “when should my grass be cut back,” and “when and how should my ornamental grass be divided?” I’ll cover these and other points in the following post.

Public interest in growing and cultivating ornamental grasses has increased dramatically in the last few years, probably because they are so versatile.

They can be planted anywhere and can be used to add colour, depth and dimensions to any garden setting. Along with the increased popularity of ornamental grasses has come a steady stream of questions about caring for them.

ornamental grass used as a water fall backdrop

Two questions we are commonly asked include “Does ornamental grass need to be cut back and when?” and “How should I divide my ornamental grass and when?”. In the following article we will supply you with some essential rules of thumb for addressing these very points.

There are different classifications of grasses to be aware of when discussing these topics. Grasses can be cool evergreen, warm season or cool season. Cool season will do most of their growing during the cooler months like the spring before temperatures get higher than 75°F (23.8°C) and then again in the fall after temperatures have dropped once more. They will keep good colour if they are maintained well during the summer, but they won’t do much growth in higher temperatures.

Warm-season grasses won’t begin growing until the temperatures get warmer in late spring or early summer. All of their flowering and growth will occur in the summer when the temperatures get warmer again. In the winter you will see these grasses turn shades of brown.

Evergreen grasses are not actually grass per say. Instead, they are special plants that have an appearance of grass, like sedges or carex, but these aren’t grass.

The Rules of Thumb for Ornamental Grasses

I find that using a few rules of thumb adds great simplicity to what would otherwise be a lengthy scientific explanation, which could be hard to remember. I actually found the detail of ornamental grasses to b quite complex myself until I was able to simplify the information into a few rules of thumb that I have found pertain to most ornamental grasses.

Ornamental Grass Rule of Thumb No. 1 –– Warm season grasses should be cut back in fall or by mid to late spring.

Warm season grasses take on brownish hues when the temperatures drop in the winter. This is the perfect time to take care of any trimming jobs you’d like to do. If you have a fall routine for gardening or live in a place where fire is a risk, you can cut them till they are no more than a few inches tall.

If fire is not a big problem in your area you may choose to leave your ornamental grasses as they are with their seed heads as a winter spectacle. When these have been frosted over in the first chill of winter you will have a beautiful sight to enjoy. Then you can do the trimming in spring before they begin to grow gain. Cut them till they are just a couple of inches.

Not all ornamental grasses are a pretty sight in the winter, so keep the not-so-attractive ones trimmed down.

Ornamental Grass Rule of Thumb No.2 –– Cool season grasses must be cut back in the early spring

As the warm season grasses are turning brown, the cool season grasses will still stay green and bright over the winter. Leave their foliage as it is till the harsh winter cool has passed and spring arrives. Only remove about two thirds the length of the plant in place. It is important to be gentle and precise when trimming cool season grass as they can be damaged by mistreatment.
Now you have a basic idea of when ornamental grasses should be cut back. The next question is how to do this. Begin by grabbing a good pair of thick leather gardening gloves. Some of these ornamental grasses have very sharp edges and protection is vital. Smaller plants will only need a small pair of shears to trim away about 2/3 of the cool season grasses. For those that have grown especially long, it might be assist to grab all the leaves in a bundle and snip them all in one clean shot. This may not be possible with all plants as some have leaves that are shorter than others.

If you have a larger clump of well-established grasses you may need something a little more powerful. An electric or gas powered weed eater with a blade rather than the usual string is a good option. If necessary you can use a chainsaw but always use proper protection and try to tie up the grasses to get as much as you can in on slice. Many times a simple pair of hedge trimmers will be more than enough.

Dividing ornamental grasses is an important way to keep your grasses alive and growing without having to buy more. Dividing your grass can keep them alive and growing as opposed to going to simply dying out. Grass will begin to die out at their centre but a timely dividing will keep them rejuvenate the entire clump.

Ornamental Grass Rule of Thumb No. 3 –– Spring to mid-summer is the best time to divide warm season grasses

Ornamental grasses need to be properly growing when they are divided but before the grass has begun to flower. If you were to divide while the plant is still dormant it won’t grow proper roots to keep it strong and healthy. Warm season grass wakes up in the spring and is most active during the hotter summer months. Warm season grasses will bloom in mid-summer.

Ornamental Grass Rule of Thumb No. 4 –– Cool season grasses should be divided in the spring or early fall

The spring and fall are the active growing times for cool season grasses. They can also be transplanted at either time of the year but there is some reason to do this during the spring. If you try and transplant in the fall you run the risk of winter chills. I had a couple of coral bells out of the ground for transplanting and were struck by an early frost –– they didn’t survive and I was sad.

Ornamental Grass Rule of Thumb No. 5 –– Evergreen grasses and other grass-like plants should be divided in the spring.

Evergreen plants aren’t like other plants and never really go dormant. But, when you divide an evergreen grass it is essentially inflicting a wound on the plant. This injury can affect the plant’s capacity to survive through the harsh winter.

How exactly do you divide a grass?

The process is very simple and a lot like dividing a perennial. First you must dig the grass up and then cut the clump into as many portions as you can but each must have some roots to sustain their life. Use the sharp edge of a trowel, a knife, pruning shears to dissect the clump of roots.

Make sure you plant the grasses again once you have finished before their roots become damaged through exposure to sunlight and air. You may even want to cover them until you do especially if the day is sunny.

Finally, they are not called “blades” of grass for nothing and a grass cut can slice deep and ugly (it’s happened to me and it hurts), protect your tender fingers with proper gloves.

Growing Bamboo and Propagation

kyoto-bamboo

The Propagation Of Lucky Bamboo Plants

If your lucky bamboo is in a state of good health, you will notice that its shape will change rather quickly.

New shoots will grow straight instead of being coiled and intertwined as it was in the beginning.

While you may have once found it attractive, the result will be a plant that does not have the proper balance.

The good this is that lucky bamboo can be propagated easily.

Taking Cuttings

Taking healthy cuttings is the first step toward fixing the problem I typically do this after trimming the mother plant. Ideally, the cutting should have a minimum of one leaf joint; more is better. Trim any excess leaves that are covering the growth node. It is possible for lucky bamboo to be rooted bare or a hormone can be used. Normally, a hormone is not required since this type of plant roots readily. If you have tried a few times and things have not gone well, a hormone can be really helpful.

Rooting In Water

This is the preferred method of completing the process. Take all of your trimmings including any leaf joints, and place them in distilled water. You should notice reddish roots emerging from near the stalk’s bottom. It is important that you keep the water fresh and clean. After new roots have grown, you can place the plant in a vase with soil or decorative stones.

Rooting In Soil

It is also possible for lucky bamboo to root in soil. Gently push the trimmed stalk into a pot of soil. It is necessary for at least one root node to be placed beneath the surface level. Place the plant in a warm, moist environment if you want it to thrive.

When you are rooting lucky bamboo, you must keep in mind that new plants will not have the same look and growth patterns as the parent. It will be an attractive, solid plant with straight stems and green leaves, but it will not have the appearance of a lucky bamboo that was shaped and grown by a professional.

Here’s a cute video about how fast Bamboo grows …